

Plugbooks makes it easy to collaborate with your team by allowing you to add different types of sub-users to your account. Whether you need full access for an admin, limited functionality for an accountant, or viewing-only permissions for a basic user, Plugbooks offers flexible roles to fit your needs.
Here’s a step-by-step guide to adding new sub-users and managing their roles in Plugbooks.
Sub-User Roles in Plugbooks:
- Admin: Has full access to all functions in Plugbooks, including managing users, settings, bookkeeping, and sales channels.
- Accountant: Limited to performing accounting-related tasks such as managing financial reports, bookkeeping entries, and related functions.
- Basic User: Can only view information but cannot make changes or perform actions within the system.
Steps to Add a New Sub-User in Plugbooks
Step 1: Log In to Your Plugbooks Account
Start by logging into your Plugbooks account with your credentials. Only Admin users can add sub-users, so ensure you are logged in as an Admin.
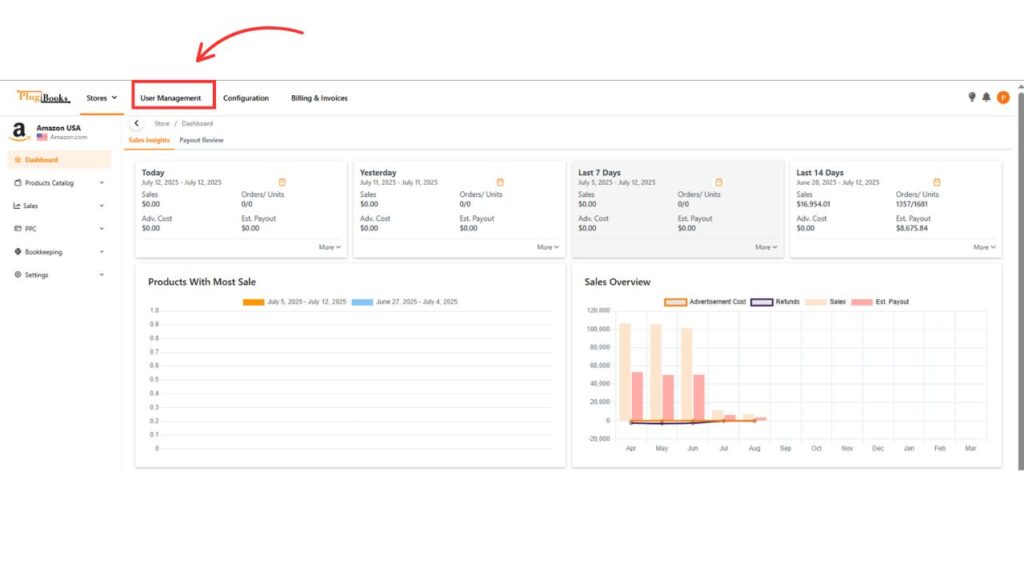
Step 2: Access User Management
- After logging in, go to the top navigation menu.
- Click on User Management from the available options.
- This section allows you to view, manage, and create sub-users under your account.
Step 3: Add a New Sub-User
- On the User Management page, click on the + New button.

Step 4: Enter Sub-User Details
- After clicking the New button, a pop-up window will appear.
- Enter the sub-user’s Name, Email, Role, and any other required details.

- Set the appropriate permissions for the new user according to your needs.

Step 5: Send an Invitation
- Once all the information is filled out and the role is selected, click Send Invitation.
- An email invitation will be sent to the sub-user.

- The email will include a login link for the sub-user to access and join Plugbooks.
- For more details, you can also visit: https://plugbooks.io/email-notification-setting/
Important: Invitation Expiry
Please note that the invitation link will expire in two days. If the sub-user does not log in within this timeframe, you will need to resend the invitation. You can do this by going back to the User Management page, selecting the user, and clicking Reinvite.
Managing Sub-Users in Plugbooks
Once sub-users have been added and have accepted their invitations, you can manage them through the User Management page. Here are some management features available to Admins:
- Change Roles: You can change the user’s role at any time (Admin, Accountant, or Basic User) depending on your needs.
- Edit User Information: Modify user details such as name, phone number, or assigned role.
- Suspend/Activate Users: You can temporarily suspend a sub-user’s access to Plugbooks and later reactivate their account when needed.
- Delete Users: If a sub-user no longer needs access to Plugbooks, you can permanently remove them from the system.

By using the User Management page, you can efficiently oversee all sub-user activities and permissions, ensuring that your team has the appropriate level of access and control.
Additional Tip:
As an Admin, you may also want to manage user-related notifications.
Learn how here:
➡️ Manage Plugbooks Notifications – How to View and Control
Conclusion
Adding and managing sub-users in Plugbooks is a simple and flexible process. Whether you’re assigning full control to an Admin, restricting access to accounting tasks for an Accountant, or allowing a Basic User to view data, Plugbooks ensures smooth collaboration with customizable user roles
For any additional help or questions, feel free to visit our FAQs or Contact Us page.